Show preparation
Getting ready to show
Horse show tips
https://www.starsminiatures.com/show-prep-article
Getting
ready to show your Minature Horse or Shetland pony can be very stressful. You have to make sure you have heath
papers, entries, make sure your horse's weight is perfect, clip your horse,
travel to the show, groom your horse and then you still have to show! All this
and have FUN too. In this article we will give you a timeline to help you get
organized and we will give you some great "How To" tips that will hopefully make
your horse show experience a winning one.
At The Farm
One Month Away: Make sure your horse's weight looks good. This is your last
chance to make any major changes to diet and exercise. If your horse has a
winter coat, spray their body and neck with water or hair conditioner to lay the
hair down and get a better idea of their true weight. We work most of our horses
3 to 4 days a week, for 20 minutes at the most. If your horse is too heavy at
this point, increase their work schedule and take away any sweet feed or feed
that is high in fat. Substitute with oats if necessary. If your horse is too
thin, decrease the number of days your horse is worked and increase the amount
of feed. If they are very thin, feed them a little lunch and a late night snack.
Horses are more likely to eat several small meals than one large one.
Now is a good time to check any health papers that will be required for the
show. This gives you plenty of time to have a vet come to your farm if
necessary.
Make sure any show entries that need to be done in advance are complete. We try
to do entries, and anything else we can, in advance instead of at the show. That
way, if an unexpected problem comes up at the show, you have less to worry
about.
If you haven't already done so, make hotel reservations. Some of the shows here
in the states are in very small towns and finding a hotel near the show grounds
can be difficult. Booking in advance guarantees you the best rooms.
Three Weeks Away: We do a pre show body clip to all the horses going to the
show, especially if the horse has a lot of hair. We use a #10 or #15 clipper
blade. A #30 blade will be too hard to clip with if your horse is has a lot of
hair. It is not necessary to clip from the horse's knees and hocks down,
especially if your horse is a problem to clip. However, it is a great time to
work on your leg clipping skills if this is an area that needs improving. If you
are inexperienced or uncomfortable fine clipping your horse's head, or doing a
facial with a razor, now is the time to learn because any mistakes that you make
have time to grow back out. What we are trying to accomplish by clipping the
horse now is to get oil into the horse's skin so they have a better hair coat.
Now you can spray their hair with a product such as Healthy Hair, and actually
get it into the skin where it needs to be. Watch your horse's hair coat and see
how quickly it grows and take note of when it looks the best and has the best
color. Now you know how many days out from the day they show to clip them again!
Clipping this early also gives you a better idea of your horse's weight. I know
keeping blankets on a horse for a long time can be a problem, but this is the
first step to getting the best show clip that you can.
Two Weeks Away: Set your horse up like you would at the show. We take turns,
with one of us looking at the horse and one of us showing the horse. Then we
decide together what last minute adjustments need to be made to the horse's
weight. Also, see what positions are the most flattering for your horse. Look
for the best angle for your horse's neck set and what is the most flattering way
to position its legs. Get a friend or family member to help you if necessary. It
is very important for you to see what the judge is going to see. If you never
stand back and look at your horse's profile, you never get an accurate vision of
what the judge might like or not like about your horse.
Get your show clothes organized. Figure out how many times you are going to show
and make sure you have enough outfits ready. Always take an extra outfit or two,
just in case an outfit gets too dirty, you lose a button or even spill your
morning coffee down your shirt. Believe me, it happens. Planning this far ahead
allows you time to have cloths dry cleaned, altered, or, my personal favorite,
shop for new ones!
We trim our horses feet about two weeks from the show date. This gives the horse
plenty of time to adjust to any changes that might be made to their feet. Some
horses also get tender footed each time they are trimmed and this gives them
plenty of time to heal. If you have a horse that is hard to measure, you can go
back over their hooves with a rasp closer to show time to take off any addition
growth necessary.
One Week Before Leaving For The Show: Check your truck and trailer to make sure
they are in good working order. Check your lights, tires and anything else that
might be a problem. You have plenty of time to get any problems fixed without it
interfering with your pre show schedule.
Make sure that you have your health papers together and any paperwork for the
show is complete. I make a separate copy of the show schedule to hang in the
grooming room at the show. I highlight the classes that we are participating in
and write each horse's name next to its classes. This will really keep you
organized on show day.
Watch the weather and try to pick the nicest day to get the trailer packed and
ready to go. There is nothing worse than waiting until the day before a show and
having to pack in the pouring rain.
Five Days Before Leaving: Remember how hard it was to clip through all that hair
a few weeks ago? Your second clip is going to be much easier, and so much
smoother because of it. You will see how clipping in advance, while being quite
a bother, is going to make a tremendous difference in your final show clip. Most
of our horses get their bodies and legs clipped three to five three days away
from the day we leave. This gives you plenty of time to get everyone done
without being in a hurry. Physically, it is hard for some people to clip an
entire horse at one time. If needed, clip the body one day and legs the next.
Know your limitations and allow for them when planning your schedule. As you
practice clipping during the year, practice clipping the entire horse with a #30
blade if you have a sorrel, chestnut, bay, black or any darker, solid colored
horse. Any color of leg can be clipped with a #30 blade. Clipping with a #30
blade allows you to clip further in advance and still have a sleek looking coat
at the show. When planning our clipping schedule, we know who shows on what day
and, in most cases, clip the ones that show first the earliest. We take into
account the horses color and hair coat. Bays, Blacks and Reds tend to look
better if their hair is a touch longer because they get more red tones, or
color, back in it. If you are good at clipping, you can clip a darker horse with
a #30 blade, five to seven days out. In Photo A, the bay horse has a beautiful,
sleek hair coat. His head, body and legs were all clipped with a #30 blade. He
is beautifully turned out and shines from his head to his tail. Notice that he
has black hooves and black hoof polish. Pintos that have a lot of body white
should be clipped with a #10 or #15 clipper blade, closer to show time. You
don't want all that pink skin to show through, but you still want the white hair
to look clean. In Photo B, the horse's body was clipped with a #15 blade.
Because of his unusual facial markings, we had to customize the way we clipped
his head so it looked its best. His legs, from the knees and hocks down, were
clipped with a #30 blade. The knees and hocks were used as a blending point
between the two different blade sizes. He has white legs and hooves, so we
polished his hooves with clear polish. We try to clip all our horse's legs with
a #30 blade. This gives you a closer, cleaner look. It is something that you
need to practice to make it look good. If you are uncomfortable clipping legs
with a #30 blade, clip them with a #15 and go back over your horse's coronet
bands and down the backs of the legs again before you leave for the show. It
might take a few times clipping your horse to figure out the best combination of
clipper blade size, and when to clip, to get the very best result. Remember to
always bath or blow out your horses before you clip them. Trying to clip a dirty
horse wears down your clipper blades, makes your clip uneven and takes longer to
do because you have to constantly clean and oil the blades. Having good, sharp
blades is a must and replacing or sharpening them can be very expensive. Bathing
your horse first to remove all the dirt and grit can save your blades and save
you money! We always bath or blow out our horses first, making sure the middle
of the back, the creases of the legs and under the mane are thoroughly clean.
Those are the spots where dirt tends to hide. After bathing, we saturate the
horse's hair with Show Sheen. This untangles the hair coat and allows your
clippers to glide through the hair giving you a smooth finish.
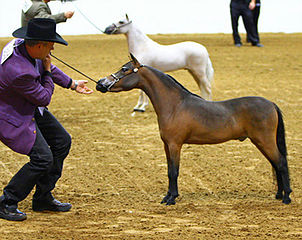
Photo A - A beautiful bay with black legs and hooves.
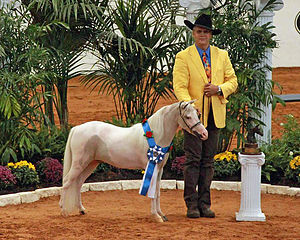
Photo B - A wildly marked pinto with white legs, white hooves and clear polish.
Three Days Before Leaving: If you have several horses to clip, you will probably
be doing that again today. If not, look for any last minute things that have not
been done. The day before you leave will be busy clipping heads and making last
minute adjustments.
Another thing you can do a few days in advance is sand the outside of your
horse's hooves. We do this in order to get a clean, smooth surface on which to
apply hoof polish. Once the polish is applied, the hoof will have a shiny, high
gloss appearance. If you have a horse with white hooves, sanding will really
give them a clean, fresh appearance. This is important because we apply clear
hoof polish to white hooves. Sanding can also remove old hoof polish from
previous shows. Even though we put black hoof polish on black hooves, sanding
them first is the only way to get the perfect, polished look. You can use
everything from simple sand paper, sanders for furniture to attachments made for
clippers. When you sand your horse's feet, be very careful not to sand the
horse's coronet band. This area is similar to a human cuticle and can be
sensitive. You also don't want to sand too deep into the hoof. We are just
trying to clean the surface of the hoof.
Get each horse a set of blankets together. Be prepared for any type of weather.
We prepare a bag, using either a kitchen size garbage bag or an Extra Large, XL
Ziploc Big Bag, for each horse with their name clearly visible on the outside.
Each horse should have a light sheet and a heavy blanket. If you live in an area
with severe cold weather, you might want an extra sheet or a polar fleece liner.
We also use a neck "slinky" on most of our horses. Make sure that your slinky
fits properly and won't rub your horse's eyes.
One Day Before Leaving: On this day we fine clip our horse's head and do a
"facial" with a razor on the horse's muzzle and above the eyes. We use the
natural bone structure and creases in the horse's head to help blend where we
use different blade sizes. Refer to our
Fine Clipping Diagram to see the size of
clipper blade that we use in a particular area. We clip the entire head with a
#30 blade first. Next, we clip the entire muzzle, inside the nostrils, the sides
of the face up to the cheeks, and up to and above the eye with a #50 blade.
Then, we use a #40 blade to blend these areas together. Go over the end of the
muzzle and up the side of the muzzle with shave cream and a disposable razor.
You can also razor right above the eye. Our goal is to mimic the look a big
horse's head gets when they are shed off and slick. The last thing we do is clip
the ears. If you have to twitch your horse to clip the ears, it is hard to
expect them to then stand still while we clip and razor the same nose that just
had a twitch on it! We clip the outside of the ears with a #30 blade and use a
#40 on the inside and edges. Please don't get discouraged if your first attempt
at fine clipping is less than perfect. It takes a lot of practice to learn how
to do this right. Every horse's head is a little different and poses its own
challenges. A horse with a bald, white face is going to be a little different
than a horse with a solid colored head. Pink skin looks different than black
skin when it is clipped. I used my broodmares to practice on when I was
learning. You have to practice with different sizes of blades to determine what
is going to suit your horse the best. When in doubt, start with a bigger blade
like a #10 or #15. Remember, you can always clip off more hair, but you can't
put it back on. Please know that right before a show is NOT the time to try
something new. That is one of the biggest mistakes anyone can make. Do what you
are comfortable with and if you want to try more, wait until the show is over.
If you aren't comfortable doing facials with a razor, just fine clip those areas
with a #50 blade. It is much better to see a nicely blended head than one that
has lots of cuts in it from an inexperienced groom. After the show, while your
horses head is still fine clipped, try using a razor and see what you think. The
only way to get a great facial with a razor is to have those areas that the
razor will be used on completely clipped with a #50 blade. Otherwise, there is
too much hair and fuzz on the horse's nose and eyes to get a smooth, blended
look. If you are unhappy with how it turns out, it has time to grow back before
the next show. When you are finished, stand back and check every part of your
horse to make sure that your grooming job is the best it can be. Take your horse
into the brightest place that you can to check for mistakes or missed areas.
At The Show
The Day Before You Show: Set out all the tack and grooming supplies that you
will need for the following day. If you left anything at home, you have time to
purchase or borrow whatever you need. We actually hang up the show halters and
tack that each horse will use, in the order that they show in. If your horses
share tack, try the tack on to make sure it fits properly. This really helps
save time on show day.
Display the copy of the show schedule you made at home where it can easily be
seen. We check with the show secretary each morning of the show and find out how
many horses are in each class that day and write it on our schedule. If there
are a lot of entries, you might have a lot of time to get ready for your class.
If some classes have no entries, the show may move quickly and you need to be
prepared. Organize the back numbers that you will use the following day.
Have any clipping touch ups complete. Reclip your horse's bridle path with a #40
blade so that it is clipped close. If necessary, touch up the very end of the
horse's nose with a razor to get rid of any stubble. Don't wait until the day
they show to do this. The biggest mistake we see people make at a show is making
their horse mad right before they perform. Most horses don't like having their
ears clipped, being twitched or having a razor stuck in their nose. You can't
upset your horse one minute and then expect them to go out and perform
flawlessly and use their ears and necks if they are mad. It is very important to
keep your horse happy before you show.
If you feel your horse needs a light workout to take the edge off, now is the
time. We decide who gets worked based on the horse's personality and who is
going to show it. As a trainer, Mike likes the horses he shows to be on fire and
feeling good. If a Youth that is timid is going to show a horse, we will work
it. If we have a young horse that is inexperienced, we might just walk it around
the arena to get it acquainted with the surroundings. Know what each horse needs
to help them perform their best on show day.
If the facility has a wash rack, and weather permits, bath your horse good and
let them dry. Use blankets or sheets to help keep your horse clean overnight. If
you cannot bath your horse, try to vacuum them and get them as clean as possible
before putting their blankets on for the night.
Make sure there are plenty of shavings in your horses stall. Not only does this
give your horse a comfortable place to sleep, it helps keep them clean,
especially if the stalls are on dirt floors.
Get a good night's sleep. With everything ready for the show day ahead, have a
good dinner and get plenty of rest. It is not only important for your horse to
be at the top of their game on show day, you are in charge, and need to be at
your best as well!
The Day You Show: Arrive with plenty of time to get things prepared and not be
in a rush. Remember that your horses have had lots of time overnight to take
their blankets off and get dirty, or do other mischievous things to make your
life harder. Arriving with a little extra time allows you to compensate for any
last minute things that might need to be done.
You want to figure out approximately when you are going to show. Check with the
show secretary to find out when, and how long, your lunch breaks will be. You
don't want your horse to stand tied up for a long period of time, but you also
don't want to rush. Remember, you never miss a class by being early! Keep track
of how quickly the show is moving along.
If you have several horses showing close together, or you just want to be ahead
of the schedule, you can put hoof polish on everyone's hooves early in the
morning, let them dry completely, and then put the horses back in their stalls.
This will save you time when it starts to get busy. Remember, if your horse has
black hooves, use black hoof polish. If your horse has white hooves, use clear
polish. There are a few exceptions. If you have a horse that is hard to put hoof
polish on, go with clear. Black hoof polish that is applied crooked can give the
illusion that your horse's legs are crooked. If you have a horse that is a big
mover and you want to accentuate that, black hoof polish on a horse with white
legs can really stand out. Whatever hoof polish you choose, make sure you do a
neat job and keep the polish in a straight line, running right along the bottom
of the coronet band.
It is getting close to show time. How far in advance you start getting ready
depends on you and how long it takes you to comfortably groom your horse. Now is
when all the planning and preparing is really going to pay off. All your
grooming supplies have already been set up, your back number is ready and your
show halter has been fitted. Bring your horse to your grooming area. His feet
should already be polished, but check for any blemishes. If your horse's hooves
are painted black, you can use a permanent marker to touch up any small
imperfections. Brush out your horse's mane and tail completely. Make sure to get
all the shavings and debris out of both. If you have a vacuum or a blow dryer,
you can use either one to get the dust off your horse's hair coat. Even if your
horse has been completely blanketed, shavings dust can still find a way to get
in. Next, take a wet wash cloth and wipe your horses face, nose, eyes and inside
the ears. Wipe clean any dirty spots your horse has on their body or legs. You
want the horse's entire body to be completely clean before you spray oil on
them. We use Show Sheen on our horse's manes and tails to keep them tangle free
while we are showing. We use an oil spray, such as Ultra Final Touch or Pepi, to
put a real shine on our horse's body, legs, mane and tail. If you have a hoof
polish enhancer, you can apply that now to give your horse's hooves an extra
glossy shine. Now, check to see how you are doing for time. You want to wait
until right before you go to the arena before you put any oil on your horse's
head. You don't want to keep reapplying the oil on the face because it can start
to look dirty and thick. Now that your horse's body is ready, and your class is
approaching, put your show halter on. We prepare our horse's head after the show
halter is on so that we don't miss any spots a thicker barn halter might cover
up. Take a large permanent black marker and apply it to your horse's upper
eyelid, on the area that you razored. Make sure you avoid the inner eye area.
This trick makes the horse's eye appear larger and more defined. Use the crease
in the eye lid as your blending point. Using a permanent marker keeps it from
fading and from going into your horse's inner eye once you apply oil to the
face. We will skip this step on a horse with pink skin around the eyes. Now you
can spray your horse's entire head and bridle path with oil spray. If your horse
doesn't like having his face sprayed, spray it into your hand and then gently
wipe it on his head and nose. You can also use a baby oil gel, usually sold in
the infant's section of the grocery store, to add extra gloss to the nose and
above the eyes. Our next tip helps to give the illusion that your horse's neck
is as thin as possible. A fluffy mane always makes the neck look thicker, so we
apply a heavy, clear hair gel to the mane, at the roots, to make sure the mane
lies down as flat as possible. If necessary, put a little on the underside of
the mane first to give extra hold. Comb it through, allowing the gel to blend
into the rest of the mane. You want to apply hair gel as few times as possible
because hair gel will catch dirt and dust and, after a few applications, start
looking dirty and muddy. If your horse has a white or flaxen mane, make sure
your hands are clean before you apply the gel. If your horse's mane is still
fluffy, spray a little show sheen or water in the length of it to give it weight
and lay it down better. You want to also put gel in your horse's forelock. If
your horse has a pretty head, use a lot of gel to lay the forelock down. If your
horse has a plain or flat head, lightly apply the gel to the forelock but still
leave it a little fluffy. Now, when viewed from a profile, you get the illusion
that your horse has some shape and dish to his forehead. Wipe any oil spray off
your show halter and check for any last minute touch ups that might need to be
made.
Right before you enter the show pen, spray your horse's entire head and body
with fly spray. Even if you don't notice any bugs back in your stall area, they
will find you when you are in the arena. Sometimes a climate controlled arena,
where there might be warmth, air condition, or the smell of concession stand
food, will actually attract insects that might not be around the stall area.
Last, but not least, put a huge smile on your face as you enter the arena. After
all, this is the moment that all your hard work is going to pay off. Look
confident and proud and let the results speak for themselves!
Summary: When we travel to shows here in the US, we usually haul between 10 to
16 head of horses. At the World Show we have over 30 horses on our show string,
some showing in Youth, Amateur, Futurity and Open classes. It is not only
important that we are organized, it is a must. You might have to adjust your
schedule to fit the show you are attending. If at all possible, we try to have
all of our horses completely show ready before we leave. We do this for several
reasons. If you run into problems on the way to the show and you end up late, it
gives you piece of mind knowing your horse can step off the trailer and be ready
to show in minutes if necessary. It is impossible to do your best job if you get
to a show late are stressed and in a hurry while getting ready to show. Also, we
like our facials to look natural and blended, and a few days hair growth does
that. If you have made mistakes clipping, a little growth will smooth things
out. We would rather see a horse with a little hair and it look good, than a
freshly clipped horse that looks, as we say here in the States, like it has been
clipped with a Weed Eater. If we have a show that is a long distance from home,
we try to go a few days in advance. The horses that show the last day might have
to get clipped at the show. You may have to do some fine clipping and touch ups,
such as reclipping the bridle path or re razoring the very end of the muzzle,
the day before you show. Remember the two most common mistakes. You don't want
to try anything new right before you show and we don't want to do anything to
upset our horses right before they go in the show ring. The main thing is, have
everything done the day before you show so that you and your horse can both
relax before show time.
With all of these tips in mind, here is an easy way to help them work better for
you. Purchase a large desk calendar with plenty of room to write notes on. Mike
and I each have one to keep track of everything that needs to be done to stay on
schedule. Sit down and plan out as much of your show schedule as possible. Make
notes when to trim feet, when entries are do, etc. You can never be too
organized. Know what your time limits are. We are lucky that we do this for our
livelihood. We have all day, and a great staff, to help carry out these tasks.
If you work full time you, it is even harder to get everything in order. If you
take care of the horses by yourself, you might need to arrange to have family or
friends to help you. Having things organized in advance allows you to relax when
you get to the show and have a little fun. After all, having fun and enjoying
our lovely Miniature Horses is what this is all about!
Credits:
Thank you! to Mike & Allison Rosauer
Stars Miniatures, USA
www.starsminiatures.com
Got any Articles to add? E-mail me -
debby@lilbeginnings.com
We wish to thank all of the people that have shared their experiences &
knowledge with others on Lil Beginnings and those that have allowed me to post
their articles. To the best of my knowledge permission was given for
everything shared here.. Articles on our pages that have been reproduced and
search optimized,
credit is given and a link is posted to your site when we know the author.
Please forgive us if we did not give full credit for any of these wonderful articles
when using them for news letters and so on. If we have used something of yours
that you would like removed please let me know.
All rights reserved. No part of any pages may be reproduced in any form or
means without written permission of Lil Beginnings Miniature Horses.
Lil Beginnings Miniature Horses is not responsible for any death, injuries, loss, or other damages which may result from the use of the information in
our pages.
Return to the top
Articles,
horse show tips, show horses, preparation,